Brake Pedal Set-up and Guidelines
Brake Pedal Guidelines
Wilwood pedal assemblies and integrated balance bars have been designed specifically for racing applications. Properly set-up, this assembly will allow for the precise adjustment of front-to-rear brake bias. The advantages of an adjustable balance bar and dual master cylinders are:
- Brake proportioning can be adjusted by use of different size master cylinder bores for front and rear brakes.
- Front to rear brake balance can be fine tuned by adjusting the balance bar.
- With two independent hydraulic systems, should one master cylinder fail, the other system may remain functional.
Brake pedals should be mounted securely. When possible, keep the master cylinder reservoir level higher than the horizontal plane of the calipers to prevent excessive fluid drain back which can result in double pumping of the pedal. If this is not possible, a two pound residual pressure valve should be plumbed into the brake line at the exit of the master cylinder to prevent fluid drain back (do not confuse the two pound valve with the ten pound version; the ten pound valve is for use with drum brakes only).
Brake pedals should be free to return when no pressure is being applied, allowing the master cylinder pushrod to return to its undepressed position. In some cases, the master cylinder spring (internal) may not be strong enough to fully return the pushrod; in this case an additional pedal return spring can be used. There are two important items for consideration:
1. The brake pedal should have an adjustable return stop on it when a strong pedal return spring is used. This prevents the master cylinder from excessively banging the snap ring stop inside the master cylinder bore (visible under the rubber boot). Adjust the stop so the pedal stops returning at the point when the master cylinder piston retracts against the snap ring, Figure 1.
Figure 1.
1. Master cylinder pedal stop and return hole position.
2. The master cylinder piston must fully retract. If the master cylinder piston is not allowed to fully retract when the brake pedal is not applied, the primary inside seal will not return past the small pressure relief hole (visible within the master cylinder reservoir on some master cylinders). This can cause excessive residual line pressure and contribute to brake drag and an overheating condition, see Figure 1, Detail “A”.
Balance Bar Adjusting
The balance bar is an adjustable lever (usually a threaded rod), that pivots on a spherical bearing and uses two separate master cylinders for the front and rear brakes. Most balance bars are part of a pedal assembly that also provides a mounting for the master cylinders. When the balance bar is centered, it pushes equally on both master cylinders creating equal pressure, given that the master cylinders are the same size bore. When adjusted as far as possible toward one master cylinder it will push approximately twice as hard on that cylinder as the other.
To set up the balance bar, thread the master cylinder pushrods through their respective clevises to obtain the desired position. Threading one pushrod into its respective clevis means threading the other one out the same amount. Sometimes this will lead to a “cocked” balance bar when the pedal is in the relaxed position, see Figure 2, “no pedal effort”. This is acceptable as long as each master cylinder pushrod is completely free of pressure when the pedal is relaxed.
Figure 2.
Note: The pushrod adjustment depicted in the figure is representative of a typical asphalt application. That is, large caliper pistons in front, small caliper pistons in the rear.
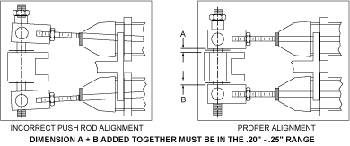
It is important that the operation of the balance bar functions without interference by over adjustment. This can occur when a clevis jams against the side of the pedal or the lever (bolt) hits the pedal bore during any point of pedal travel, Figure 3.
Lever movement should be unimpeded throughout pedal travel. In the neutral position, clevises should have between .20” - .25” total clearance between the side of the pedal. The large washers between the pedal and clevis should remain loose. Make sure that the master cylinder pushrods remain true in relationship to the cylinder during entire pedal travel; pushrods should not be pushing master cylinder pistons at an angle. See Figure 4.
NOTE: In its non-depressed position, the pedal and balance bar should allow the pushrod of the master cylinders to fully return. This can be checked by feeling pushrods for very slight movement, not loose movement. Master cylinder pistons should be against the retaining snap ring (under boot).
Figure 3.
Balance bar lever interference.
Figure 4.
Example of pushrod alignment.
Pedal Ratios / Mechanical Leverage
Pedal ratio, or mechanical leverage is the ratio calculated from the length from the pivot point of the pedal to the center of the foot pedal (A), divided by the length from the pivot point to the master cylinder pushrod (B). Refer to the figures below.
Mechanical leverage is simply a means of increasing the brake force without increasing your leg effort. As “A” gets longer and “B” gets shorter, the mechanical leverage increases brake force without pushing harder on the pedal. The disadvantage is that the pedal stroke also increases, requiring you to push the pedal further.
If uncertain about which pedal ratio is right for your application, a 6:1 ratio is an excellent starting point.

Figure 2.
A = Distance form pivot point to middle of push / pull point
B = Distance form pivot to point of push on master cylinder
P = Pivot point
F = Force or push
Copyright Wilwood


